Communication #
Request-Response #
Overview #
- Fundamental communication pattern
- The most common patterns for communication in client-server architectures
Demo #
Server code
// server.js
const http = require('http');

const server = http.createServer((req, res) => {
    console.log(`Received request: ${req.method} ${req.url}`);

    if (req.url === '/hello') {
        if (req.method === 'POST') {
            let body = '';

            req.on('data', chunk => {
                body += chunk.toString(); // Convert buffer to string
            });

            req.on('end', () => {
                res.writeHead(200, { 'Content-Type': 'text/plain' });
                if (body.trim() === "ping") {
                    res.end('pong');
                } else {
                    res.end('');
                }
            });

        } else {
            res.writeHead(200, { 'Content-Type': 'text/plain' });
            res.end('world');
        }
    } else {
        res.writeHead(404, { 'Content-Type': 'text/plain' });
        res.end('Not Found');
    }
});

server.listen(2000, () => {
    console.log('Server is listening on port 2000');
});
Client code
fetch('http://localhost:2000/hello', {
    method: 'POST',
    headers: { 'Content-Type': 'text/plain' },
    body: 'ping'
})
.then(response => response.text())
.then(data => console.log(data))  // Should log: "pong"
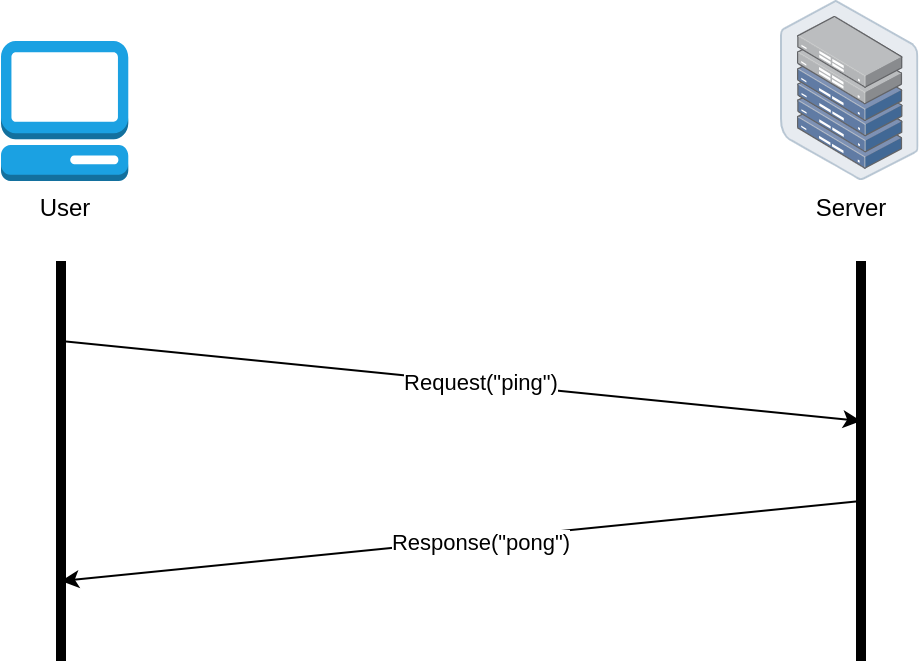
Instruction
- Start the server by running
node server.js
1.1. Your terminal will display:Server is listening on port 2000 - Open your browser and enter:
http://localhost:2000/hello
2.1. Your terminal will first log:Received request: GET /hello
2.2. Then, your browser will display:world - Open the browser console and run Client code
3.1. Your terminal will first log:Received request: POST /hello
3.2. Then, your browser console will display:pong
Short Polling #
Overview #
- Based on the Request-Response design pattern
- Continuously polls the server for new updates
- Near real-time updates
- Client controls the frequency
Use case #
- Monitor stocks or cryptocurrencies
- Fetch status updates
- User notifications
Demo #
Server code
// server.js
const express = require('express');
const app = express();
const port = 2000;

app.get('/', (req, res) => {
    res.send('Hello world');
});

app.get('/bitcoin', (req, res) => {
    const randomValue = Math.floor(Math.random() * 111) - 10; // Random value between -10 and +100
    res.json({ coins: randomValue });
});

app.listen(port, () => {
    console.log(`Server is running at http://localhost:${port}`);
});
Client code
function fetchBitcoinData() {
    fetch('http://localhost:2000/bitcoin')
        .then(response => response.json())
        .then(data => {
            console.log(`Bitcoin value: ${data.coins}`);
        });
}

setInterval(fetchBitcoinData, 1000);
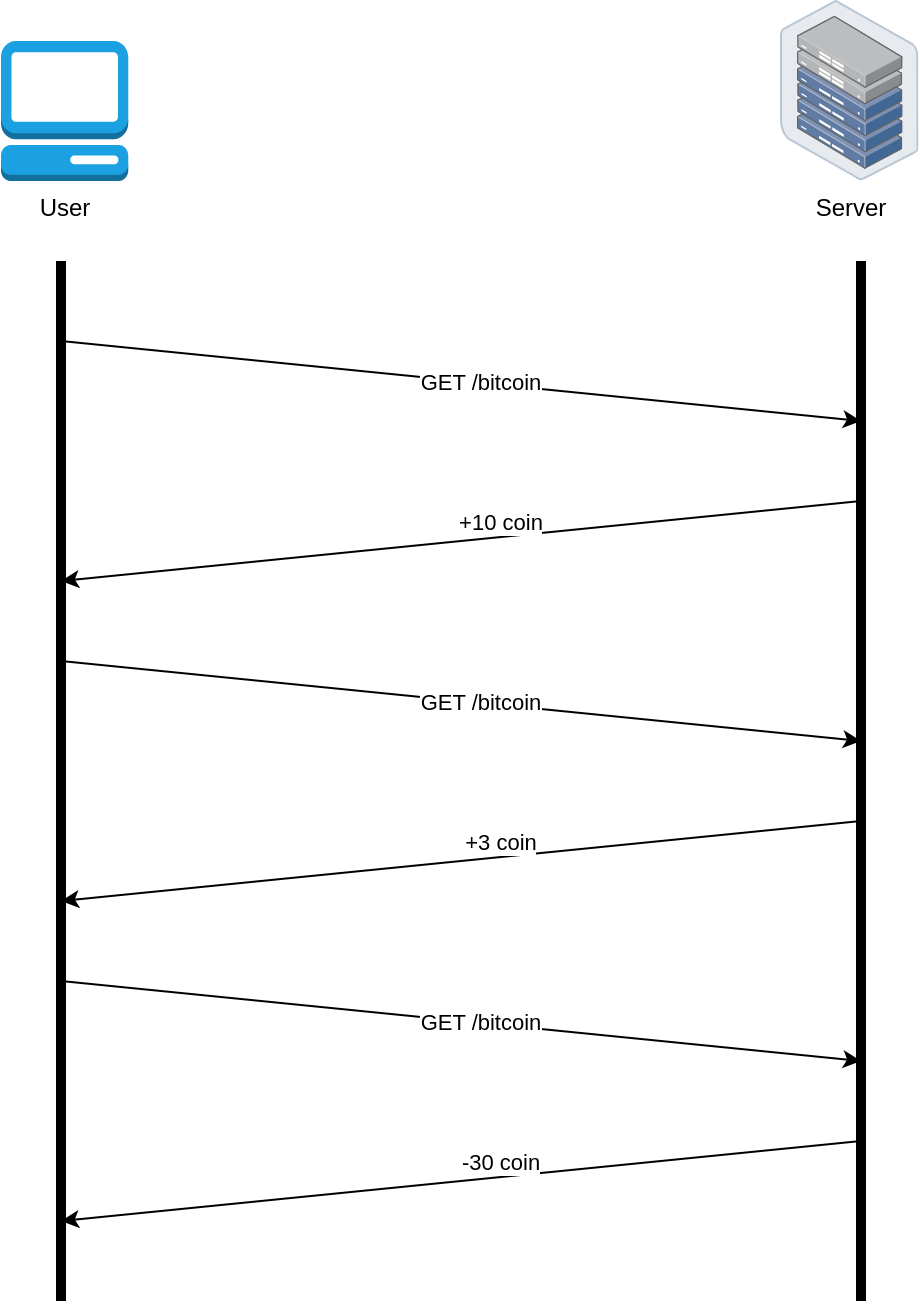
Instruction
- Start the server by running
node server.js
1.1. Your terminal will display:Server is running at http://localhost:2000 - Open your browser and enter:
http://localhost:2000
2.1. Your browser will display:Hello world - Open the browser console and run Client code
3.1. Your browser console will continuously display:>> Bitcoin value: 10 >> Bitcoin value: 100 >> Bitcoin value: 26 >> Bitcoin value: -6 >> Bitcoin value: 65 ...
Long Polling #
Overview #
- Based on the Request-Response design pattern
- Holds the request open and only responds after completing the task
- Real-time updates
- Server controls the timing of response
Use case #
- Fetch status updates
- User notifications
Demo #
Server code
// server.js
const express = require('express');
const app = express();
const port = 2000;

app.use(express.json());

app.get('/', (req, res) => {
    res.send('Hello world');
});

app.post('/validate-music', (req, res) => {
    const { musicName, capacity } = req.body;

    // Simulate processing time with a random delay between 5 to 10 seconds
    const delay = Math.floor(Math.random() * 6) + 5;

    console.log(`Received request to validate music: ${musicName}, capacity: ${capacity}`);

    setTimeout(() => {
        res.json({ message: `The music "${musicName}" is valid.` });
    }, delay * 1000);
});

app.listen(port, () => {
    console.log(`Server is running at http://localhost:${port}`);
});
Client code
function validateMusic(musicName, capacity) {
    fetch('http://localhost:2000/validate-music', {
        method: 'POST',
        headers: {
            'Content-Type': 'application/json'
        },
        body: JSON.stringify({ musicName, capacity })
    })
    .then(response => response.json())
    .then(data => {
        console.log(data.message);
    });
}

validateMusic('Supernova', '5MB');
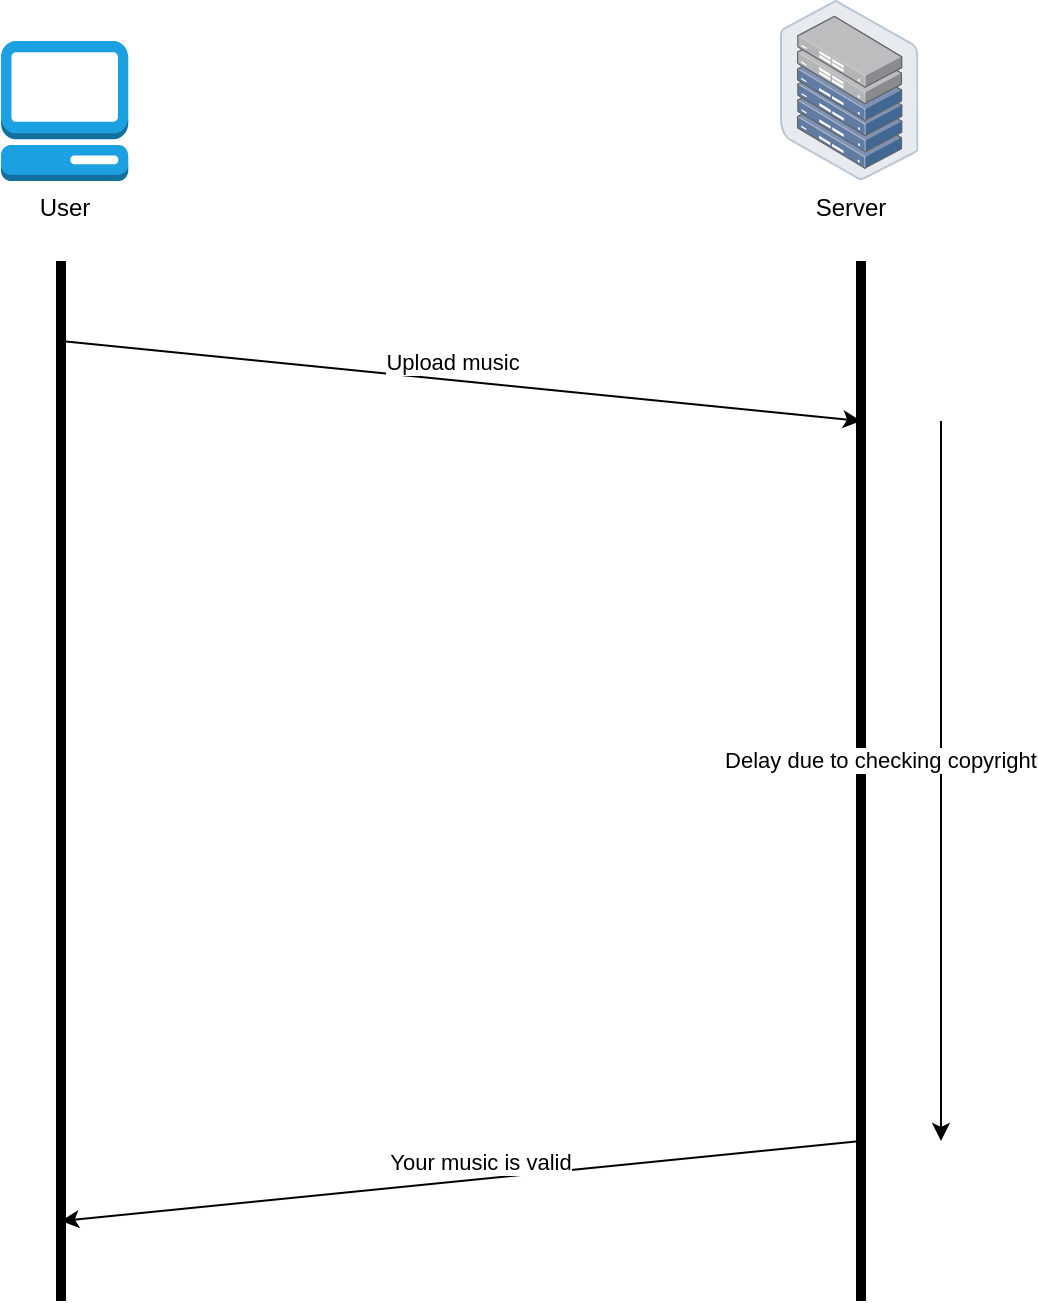
Instruction
- Start the server by running
node server.js
1.1. Your terminal will display:Server is running at http://localhost:2000 - Open your browser and enter:
http://localhost:2000
2.1. Your browser will display:Hello world - Open the browser console and run Client code
3.1. Your terminal will first log:Received request to validate music: Supernova, capacity: 5MB
3.2. Then, your browser console after some seconds will display:The music "Supernova" is valid.
Push #
Overview #
- Real-time updates
Use case #
- Chat and messaging apps
- Notification systems
Demo Websocket #
- Bidirectional communication
Server code
// server.js
const http = require('http');
const WebSocket = require('ws');
const port = 2000;

// Create an HTTP server
const server = http.createServer((req, res) => {
    if (req.url === '/') {
        res.writeHead(200, { 'Content-Type': 'text/plain' });
        res.end('Hello, World!');
    } else {
        res.writeHead(404, { 'Content-Type': 'text/plain' });
        res.end('Not Found');
    }
});

// Create a WebSocket server on top of the HTTP server
const wss = new WebSocket.Server({ server });

wss.on('connection', ws => {
    console.log('Client connected the WebSocket connection');

    ws.on('message', message => {
        console.log(`Received: ${message}`);

        // Simulating music validation process
        let progress = 0;

        const interval = setInterval(() => {
            progress += Math.floor(Math.random() * 10) + 10; // Random progress between 10% - 20%
            if (progress >= 100) {
                progress = 100;
                ws.send(JSON.stringify({ status: 'complete', message: 'Music validation complete and valid!' }));
                clearInterval(interval);
            } else {
                ws.send(JSON.stringify({ status: 'in-progress', progress: progress }));
            }
        }, 1000);
    });

    ws.on('close', () => {
        console.log('Client disconnected the WebSocket connection');
    });
});

server.listen(port, () => {
    console.log(`Server running on http://localhost:${port}`);
    console.log(`WebSocket server running on ws://localhost:${port}`);
});
Client code
const socket = new WebSocket('ws://localhost:2000');

socket.onmessage = function(event) {
    const data = JSON.parse(event.data);
    if (data.status === 'in-progress') {
        console.log(`Validation progress: ${data.progress}%`);
    } else if (data.status === 'complete') {
        console.log(data.message);
        socket.close();
    }
};

socket.onopen = function() {
    console.log('Connected to the server');
    // Simulating a music upload with a title and arbitrary size
    const musicData = {
        title: 'My Awesome Track',
        size: 1234
    };
    socket.send(JSON.stringify(musicData));
};

socket.onclose = function() {
    console.log('Disconnected the WebSocket connection from the server');
};
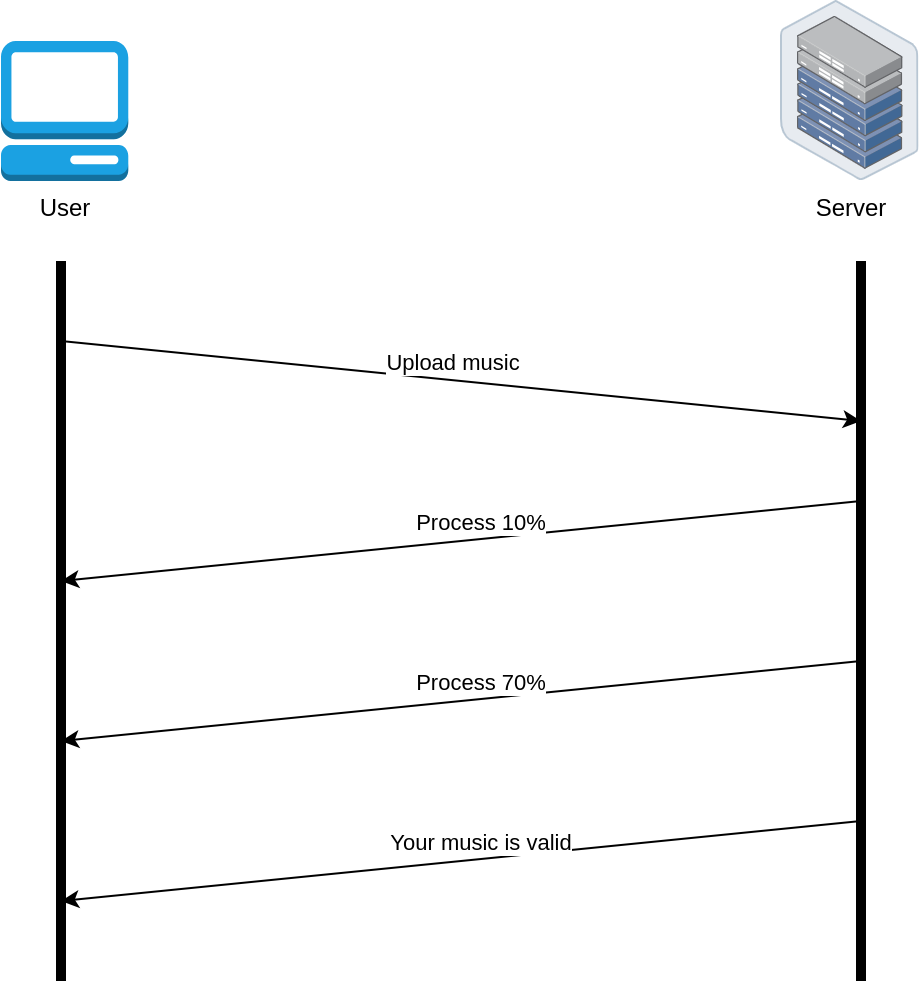
Instruction
- Start the server by running
node server.js
1.1. Your terminal will display:Server running on http://localhost:2000 WebSocket server running on ws://localhost:2000 - Open your browser and enter:
http://localhost:2000
2.1. Your browser will display:Hello world - Open the browser console and run Client code
3.1. Your terminal will first log:3.2. Then, your browser console will display:Client connected the WebSocket connection Received: {"title":"My Awesome Track","size":1234}>> Connected to the server >> Validation progress: 18% >> Validation progress: 28% >> Validation progress: 39% >> Validation progress: 50% >> Validation progress: 65% >> Validation progress: 80% >> Validation progress: 97% >> Music validation complete and valid! >> Disconnected the WebSocket connection from the server
Demo Server-sent events #
- Unidirectional communication
Server code
// server.js
const http = require('http');
const port = 2000;

let currentProgress = 0;

const server = http.createServer((req, res) => {
    if (req.method === 'GET' && req.url === '/') {
        res.writeHead(200, { 'Content-Type': 'text/plain' });
        res.end('Hello, World!');
    } else if (req.method === 'POST' && req.url === '/upload') {
        let body = '';

        req.on('data', chunk => {
            body += chunk.toString();
        });

        req.on('end', () => {
            console.log('Received music data:', body);

            currentProgress = 0;

            let interval = setInterval(() => {
                currentProgress += Math.floor(Math.random() * 10) + 10; // Random progress between 10% - 20%
                if (currentProgress >= 100) {
                    currentProgress = 100;
                    clearInterval(interval);
                }
            }, 1000);

            res.writeHead(200, { 'Content-Type': 'text/plain' });
            res.end('Music data received and processing started');
        });
    } else if (req.method === 'GET' && req.url === '/uploadprogress') {
        // Set headers for SSE
        res.writeHead(200, {
            'Content-Type': 'text/event-stream',
            'Cache-Control': 'no-cache',
            'Connection': 'keep-alive'
        });

        let interval = null;
        const sendProgress = () => {
            if (currentProgress < 100) {
                res.write(`data: ${JSON.stringify({ status: 'in-progress', progress: currentProgress })}\n\n`);
            } else {
                res.write(`data: ${JSON.stringify({ status: 'complete', message: 'Music validation complete and valid!' })}\n\n`);
                clearInterval(interval);
                res.end();
            }
        };

        interval = setInterval(sendProgress, 1000);
    } else {
        res.writeHead(404, { 'Content-Type': 'text/plain' });
        res.end('Not Found');
    }
});

server.listen(port, () => {
    console.log(`Server running on http://localhost:${port}`);
});
Client code
function uploadMusicData() {
    const musicData = {
        title: 'My Awesome Track',
        size: 1234
    };

    fetch('http://localhost:2000/upload', {
        method: 'POST',
        headers: {
            'Content-Type': 'application/json'
        },
        body: JSON.stringify(musicData)
    })
    .then(response => response.text())
    .then(data => {
        console.log(data);

        // Create an EventSource connection to the server
        const eventSource = new EventSource('http://localhost:2000/uploadprogress');

        eventSource.onmessage = function(event) {
            const data = JSON.parse(event.data);
            if (data.status === 'in-progress') {
                console.log(`Validation progress: ${data.progress}%`);
            } else if (data.status === 'complete') {
                console.log(data.message);
                eventSource.close();
            }
        };

        eventSource.onopen = function() {
            console.log('Connected to the server for progress updates');
        };
    });
}

uploadMusicData();
Instruction
- Start the server by running
node server.js
1.1. Your terminal will display:Server running on http://localhost:2000 - Open your browser and enter:
http://localhost:2000
2.1. Your browser will display:Hello world - Open the browser console and run Client code
3.1. Your terminal will first log:Received music data: {"title":"My Awesome Track","size":1234}
3.2. Then, your browser console will display:>> Music data received and processing started >> Connected to the server for progress updates >> Validation progress: 18% >> Validation progress: 28% >> Validation progress: 39% >> Validation progress: 50% >> Validation progress: 65% >> Validation progress: 80% >> Validation progress: 97% >> Music validation complete and valid!
Publish-Subcribe #
- Also known as Message Queue Design Pattern
- Used in microservices architectures
RabbitMQ #
- Producer sends and monitors if the message reaches the intended consumer
- Messages are deleted once consumed
- Designed for complex message routing
- Support message priorities
Kafka #
- Consumers keep track of message retrieval with an offset tracker
- Retain messages according to the retention policy
- There’s no message priority
Reference #
- Freecodecamp: Communication Design Patterns for Backend Development (Sep 12th, 2023)
- Udemy: Fundamentals of Backend Engineering (Feb, 2024)
- Linkedin: Understanding Short Polling: A Simple Backend Communication Pattern (Aug 7th, 2024)
- Stackoverflow: WebSockets vs. Server-Sent events/EventSource (Mar 16th, 2011)
- Amazon: Message Queues
- Amazon: What’s the Difference Between Kafka and RabbitMQ?
Help improve my blog
Was this page helpful to you?
This page was last modified at 2023-11-15